Setting WordPress on Google Cloud Platform
Wordpress is really not my are of interest but I'm writing this because of several reasons:
1. In comments of my youtube video regarding Google Cloud DNS people had different problems and with one way or another, it was always related to setting up WordPress website (mostly connecting domain).
2. With my article Service Accounts on Google Cloud Platform I started unintentionally series of articles with topic "Google Cloud Platform for non-developers" i.e. using features of GCP without writing single line of code, so again this article will be written for non technical readers in mind and those who don't have much experience with Google Cloud.
3. With GCP Free Tier you can have WordPress website for free for small traffic website, so I wanted to put everything in one place how to setup workable WordPress website with your own domain and have most important things covered.
I'll go through several steps:
1. Creating server with WordPress
4. Monitoring, changing VM type
1. Creating server with WordPress
There are several ways how to deploy Wordpress website on Google Cloud Platform. One way would be to use Google App Engine and Google Cloud SQL, installing manually on Google Compute Engine, using Docker image, Kubernetes etc. but I'll stick to the simplest and quickest: Using Cloud Launcher with few clicks and minimal configuration.
Login to Cloud Console, if you don't have project, you'll need to create one. Then in menu on the right side, click on Cloud Launcher

In Cloud Launcher there are many products / solutions which you can deploy with few clicks, so that's why will type in Search field word wordpress to get only those related to WordPress.

As you can see there are many solutions for Wordpress deployment. They are provided by different companies and offer extra functionalities but will use WordPress Google Click to deploy (currently it was displayed on 4th row).

When you click on it, new window will be opened with more detailed description.

In left column there are details such as what kind of software and versions will be installed, in right column (Wordpress, Apache, PHP, MySql) there is pricing for default settings (49.35$ per month). Click on blue button "LAUNCH ON COMPUTE ENGINE" to start launching process and change some settings.

There are few settings you can / should change:
Deployment name - if you want to have different than default "wordpress-1" you can change it, but it's not so important
Zone - is related to geographical area where you expect your visitors will come. Google has datacenters now in all continents so you can select zone according your preferences.
Machine type - this is important to change, because we will use the smallest one called micro (or f1-micro) which is for free. Luckily you can change machine type afterwards if this one will be too small for you.
Administrator Email - this is WP specific and it's mandatory so you need to enter email there
Other settings you don't need to change, so at the bottom click Deploy.
After that you will be redirected to another page and you will see deployment progress.

When there is green icon displayed it means deployment is completed. On the right side you have important data like IP address of website, admin and database passwords. It's good to have them somewhere kept safe.
When you click on url for Site address (in my case it's http://35.206.116.55) you can see default Wordpress page:

So now we have working Wordpress website live in internet. There are few things that can be improved.
2. Setting up domain
Primary reason to have website is to connect it with your own domain, so it's not only available under http://35.206.116.55. I own domain mytestdomain.net which I will use through this example.
To connect domain with your Wordpress server, you need to go to your domain registrator like GoDaddy or Google Domains and go to sections for editing DNS for your domain. We will add 2 DNS records.
one is A record for mytestdomain.net and value is IP address of Wordpress server, in my case it's 35.206.116.55
second one is CNAME record for www subdomain and value mytestdomain.net. This record basically enables that www.mytestdomain.net works for your website.
Image speaks for thousand words, so this is how my DNS settings looks like.

After some time (few minutes) when you type http://mytestdomain.net or http://www.mytestdomain.net you should see your website. If that doesn't happen, try to use different browser or incognito mode, clear cache etc. because domain setting are cached.
3. Configuring Wordpress
Next are minimal changes in Wordpress configuration related to domain setup.
Login to Wordpress admin on url http://35.206.116.55/wp-login.php or http://mytestdomain.net/wp-login.php. You need to use Wordpress administrator username (admin) and Wordpress admin password (in my case QHUKg8g2mS+sSV) to login.

Go to Settings and then General.

In our case most important settings to change are WordPress Address (URL) and Site Address (URL). Instead of IP address, set your domain name.

These changes are needed mostly that URLs on your website point to your domain and not IP address.
4. Monitoring, changing VM type, extra settings
4.1. Monitoring
To look or change details on your server, in Cloud Console, go to Compute Engine section and then VM instances, then click on your server name to see details.

Under Details tab you can see general information about server, if you scroll down bellow you can also see all default passwords that were created during deployment.

When you switch to Monitoring tab you can see graphs for different properties. Most important is first one - CPU graphs.

CPU usage is proportional to your website traffic and since this VM machine is smallest one offered, it can happen that even modest traffic can glut CPU so website will be slow responsive. If you see usage close (or above) 100% it's better to change VM type. Now if you occasionally go over 100% that's ok, because these virtual CPUs are designed to handled that, but for longer term it's not good.
4.2. Setting Static IP address
If you plan to change machine type or just stop and start for some reason, there is possibility that IP address will change and your domain connection will break, unless you also update new IP in domain's DNS settings as we did "Setting up domain" part. To avoid that, you can change your IP address from Ephemeral to Static, which means that that IP is now forever or until you explicitly release it. It's cost free as long as IP address is used. So in case you delete VM and don't want to set up new VM and use this IP, you need to delete it also, otherwise you will be charged.
Go to VPC network (under Networking Section) and then External IP address. You'll see list of IP address. You see that it's Ephemeral and that is used by your VM instance.

So when you click there and select Static you will be prompted to set name and optional description and click on Reserve.

You can see now change.

So now you don't have to worry that website will be broken if you change some server settings (which I will do in next section).
4.3. Changing VM type
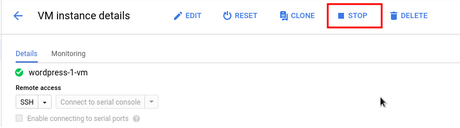
In order to change VM type, you need to stop VM instance first by clicking on STOP button.
It takes some time (half minute) for VM to stop, you'll see in notifications circle spinning when it will be under progress and number 1 when it's done. You can click on it to see more details. Of course for time VM is stopped, website is not available.


You can also see if VM is trully stopped when icon is gray (but not green) as on image bellow.

Now when you click on EDIT button you can change Machine type.
At the top, there is section "Machine type", click on dropdown selection

You will have options to select new machine type. Currently you have micro (f1-micro), Depending on your traffic, you can select next in size and that is small (g1-small) or as I selected n1-standard-1 which has 1 virtual CPU and 3.75GB RAM. small costs around 14$ per month whereas n1-standard-1 around 25$ per month. Beside that, generally into total costs beside VM instance are included costs for network traffic. If you registered you should get 300$ worth of credit to use on Google Cloud platform which is valid for one year so basically with that you should be able to run n1-standard-1 VM instance for free for your WordPress website.

Click on desired machine type and you can see it displays changed.

You need to go to bottom of page (scroll) and hit Save button to save changes.

It will take few seconds until changes are saved, you can check in notifications in top corner.

Finally you need to start VM instance by clicking on button Start, and then again confirming that you want to start.

When machine is started you should see green icon and new notification.

Now on monitoring tab and graphs, you should see lower consumption of CPU and your website should be faster and quicker in responses.
4.4. Enabling https (ssl)
Nowadays it's important for website to have secure connection to users (using https instead of http) and in order to enable that, certificate is needed. There are plenty of companies which offer certificates, but most popular service is LetsEncrypt which offers certificates for free. Although LetsEcnrypt has tools that do lot of things automatically, in order to use it on Google Cloud in setup which I deployed as an example in this article, that's not so simple. Executing commands and editing some files on server is needed and that's beyond of the scope of this article so I won't go throught it. I found good article which goes step by step process how to set it up https://www.onepagezen.com/free-ssl-certificate-wordpress-google-cloud-click-to-deploy/.
There are lots of thing that could be mentioned, like for example creating backup, but aim was to provide comprehensive step by step tutorial to setup website simply and quickly and connect to domain.