Uploading multiple files to Google Cloud Storage from Browser
From time to time, there is need in web application for users to upload file or multiple files to server, whether it is image or video or some text file.
Starting point is usually HTML form with select button:
<form action="/" method="POST" enctype="multipart/form-data">
    Select files: <input type="file" name="files" multiple>
    <input type="submit" value="Upload">
</form>
When button is pressed, form is submitted and whole content is uploaded to server. This usually works for smaller files. For bigger files this approach (few tens of mega bytes) can be inefficient due to memory consumption and time, since after you upload content to server, you still need to save it somewhere (either in database or some kind of storage).
Google Cloud Platform has product called Google Cloud Storage which is suitable (among many things) for storing uploaded user files but it can be also used for archiving data for example where size of single file can be up to 5TB.
Access to Storage buckets by default is private, i.e. buckets are not open to the world to have write/read access unless explicitly configured but for security reasons it's better to stay private. In order for somebody to have access to object in bucket, so called "signed url" is created with limited time validity. So instead of uploading files to server, we will generate signed url to which we will upload files (I'll explain this later in more detail). To make this work, there are needed some javascript tweaks.
Full code for this example is on https://github.com/zdenulo/gcs_multiple_upload, I will discuss here only the most important parts of process.
Instead of pressing the button for upload, upon selection of files onchange event is triggered which calls handleFiles function:
<form action="/" method="POST" enctype="multipart/form-data">
    Select files: <input type="file" name="files" multiple onchange="handleFiles(this.files)">
</form>
<script>
/**
         * Posts some data to url after upload
         * @param key Datastore Entity key (urlsafe)
         */
        function postUploadHandler(key) {
            $.post('/postdownload/',
                {
                    key: key
                })
        }

        /**
         * Ajax request to Google Cloud Storage
         * @param url: signed url returned from server
         * @param file: file object which will be uploaded
         * @param key: database key
         */
        function upload(url, file, key) {
            $.ajax({
                url: url,
                type: 'PUT',
                data: file,
                contentType: file.type,
                success: function () {
                    $('#messages').append('<p>' + Date().toString() + ' : ' + file.name + ' ' + '<span id="' + key + '"' + '></span></p>');
                    postUploadHandler(key)
                },
                error: function (result) {
                    console.log(result);
                },
                processData: false
            });
        }

        /**
         * Used as callback in Ajax request (to avoid closure keeping state)
         */
        var uploadCallback = function (uploadedFile) {
            return function (data) {
                var url = data['url'];
                var key = data['key'];
                upload(url, uploadedFile, key);
            }
        };

        /**
         * After selecting files and clicking Open button uploading process is initiated automatically
         * First request to get signed url is made and then actual upload is started
         * @param files: selected files
         */
        function handleFiles(files) {
            for (var i = 0; i < files.length; i++) {
                var file = files[i];
                var filename = file.name;
                $.getJSON("/get_signed_url/", {
                        filename: filename,
                        content_type: file.type
                    },
                    uploadCallback(file)
                );
            }
        }
</script>
Handle files function loops over selected files and first makes request to backend url "/get_signed_url" which returns signed url from Cloud Storage to which file data will be uploaded. After that it calls uploadCallback where in upload function through Ajax PUT request, file data is uploaded to Cloud Storage. Upon upload filename and time is displayed on page and postUploadHandler is called to handle post upload process.
For backend part I created FileModel which is using Cloud Datastore to store path in Cloud Storage plus some possible other custom fields.
class FileModel(ndb.Model):
    filename = ndb.StringProperty()
    date_created = ndb.DateTimeProperty(auto_now_add=True)
    date_updated = ndb.DateTimeProperty(auto_now=True)
and handler for "get_signed_url" url looks like this:
class SignedUrlHandler(webapp2.RequestHandler):
    def get(self):
        """Generates signed url to which data will be uploaded. Creates entity in database and saves filename
        Returns json data with url and entity key
        """
        filename = self.request.get('filename', 'noname_{}'.format(int(time.time())))
        content_type = self.request.get('content_type', '')
        file_blob = bucket.blob(filename, chunk_size=262144 * 5)
        url = file_blob.generate_signed_url(datetime.datetime.now() + datetime.timedelta(hours=2), method='PUT',
                                            content_type=content_type)
        file_upload = FileModel(filename=filename)
        file_upload.put()
        key_safe = file_upload.key.urlsafe()
        data = {'url': url, 'key': key_safe}
        self.response.write(json.dumps(data))
from request I get filename and content type, I create blob (object) in bucket, then I am using generate_signed_url method where main parameter is expiration time (in this example set to 2 hours) and explicit method PUT which is used for file uplod (otherwise GET method is used to generate signed url for reading file in Cloud Storage). I create then entity for FileModel and in response I return json data with url and key of entity. The reason why I am returning key is that after upload process is completed I can fetch entity and do some custom task with that object, for exampe trigger some background process which will process the file for example.
Cool thing with this process that it allows to upload files in parallel, which reduces total upload time.
In next part I will describe practical steps to setup and deploy this solution:
- Create bucket in Google Cloud Storage
- Setup CORS (Cross Origin Resource Sharing)
- Setup Service Account
- Setup Google App Engine application which will render HTML template and generate signed urls for upload
1. Create bucket in Google Cloud Storage
There are several ways how to create bucket in GCS. To do it in shell you need to have installed Cloud SDK (and gsutil tool) and execute simple command:
gsutil mb gs://<BUCKET-NAME>
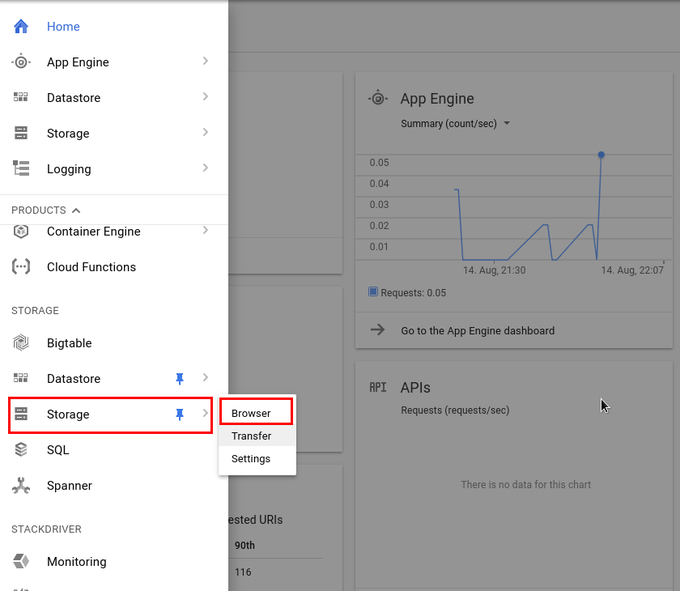
or via web interface in console.cloud.google.com. In left menu go under Storage Section and click on Storage option and then Browse.

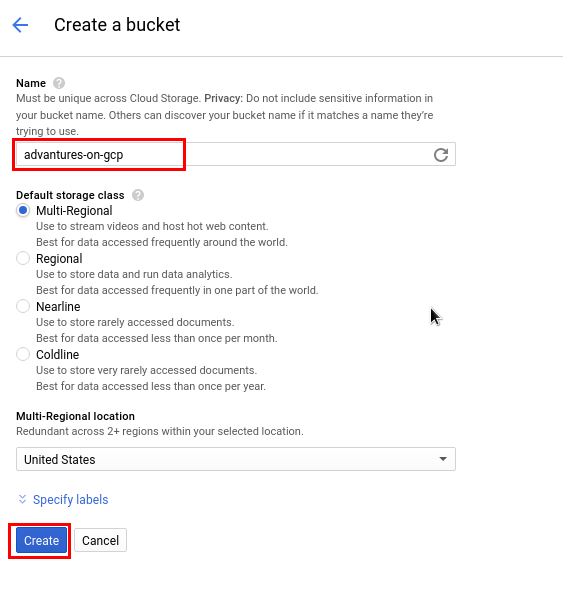
Click on Create Bucket button

You need to type name for bucket (needs to be unique across whole Cloud Storage) and click Create.

Here is displayed created bucket

2. Setup CORS (Cross Origin Resource Sharing)
In order to upload files from some website you need to setup CORS so that bucket accept requests from your domain. To do that, we need to upload configuration file with allowed domains using gsutil (it cannot be done through web interface). This is sample of json file to setup cors:
[
    {
      "origin": ["http://adventures-on-gcp.appspot.com", "http://localhost:8080"],
      "responseHeader": ["Content-Type"],
      "method": ["GET", "HEAD", "DELETE", "PUT", "POST"],
      "maxAgeSeconds": 3600
    }
]
command is:
gsutil cors set gcs_cors.json gs://<BUCKET-NAME>
Of course setting localhost as allowed domain is only good for development / testing purpose.
3. Setup Service Account
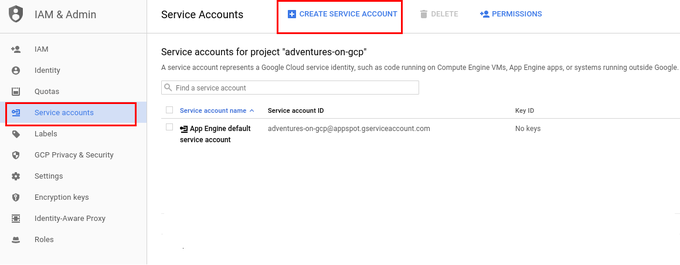
Next step is to create Service Account through which we will access Cloud Storage. This is done in IAM section. Under IAM section go to Service accounts and then click on Create Service Account.
Under IAM section click on Service Accounts and then click on button Create Service Account

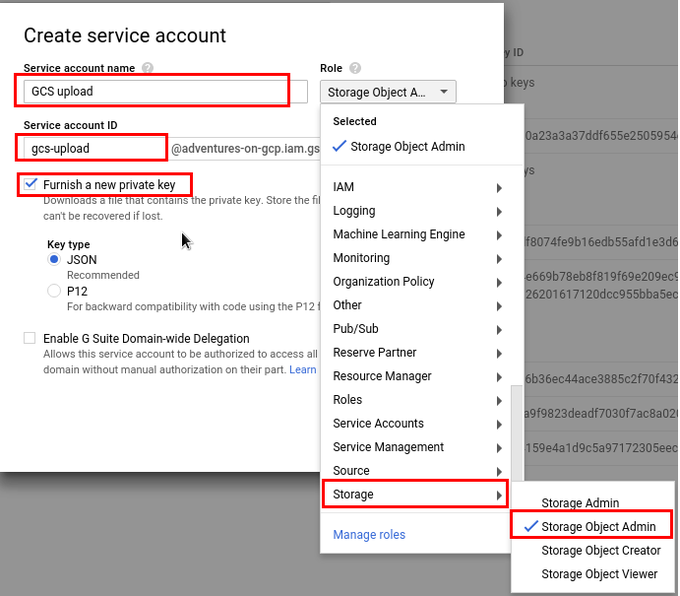
You need to set up Service Account name (for display purposes), Service Account ID and set role to be Storage / Storage Object Admin. If you already have some service account which you want to use, you can assing this role to that account. Checkout Furnish a new private key option so you can download file in json format and use it in project.

4. Setup Google App Engine application
Like I mentioned before we need some kind of backend which will render html page and generate signed url for bucket in Cloud Storage. Google App Engine is perfect solution since it allows quick and easy deployment of code and scales automaticaly.
Code for backend is written in Python and cliend library for Storage is used to simplify work with Cloud Storage. I am using Google App Engine Standard as backend server but this should work on any other type. In app.yaml file bucket name and service json file name and project id should be set.
Required libraries are installed with:
pip install -r requirements.txt -t lib
upload with command:
appcfg.py update .
or
gcloud app deploy app.yaml --promote
Here is screenshot of requests when uploading 3 files around 65, 67, 69 MB.
![]()
This is not the only way how to upload files. Part of this process (generating signed urls) can be used for mobile applications for files upload.